HOW TO CHOOSE THE RIGHT CABLE LUG FOR SWITCHGEAR

HOW TO CHOOSE THE RIGHT CABLE LUG FOR SWITCHGEAR?
I’ve seen it more times than I care to count. A multi-million dollar production line goes silent, a data center goes dark, and the frantic troubleshooting begins. Hours later, the culprit is found not in a complex PLC or a massive transformer, but in a component that costs a few dollars: a melted, discolored, and failed cable lug inside a critical switchgear panel.
A cable lug is the Achilles’ heel of your power system. It’s the final handshake between the power cable and the equipment. If that handshake is weak, the entire system is compromised. Choosing a lug isn’t a task for an intern or a decision to be left to the lowest bidder; it’s a critical engineering decision that underpins the safety, reliability, and uptime of your entire facility.
The Bottom Line Up Front: Key Takeaways
If you read nothing else, burn these three principles into your memory:
- A lug is not a commodity; it’s a critical component of your system’s reliability. Treating it as a throwaway item is the first step toward a future failure.
- Matching materials is non-negotiable to prevent a ticking time bomb of corrosion. Connecting an aluminum cable to a standard copper lug without the proper interface is one of the most common and dangerous mistakes in the field.
- The right crimp requires the right tool and die—no exceptions. Using pliers or the wrong crimper turns a precision-engineered component into a point of failure.
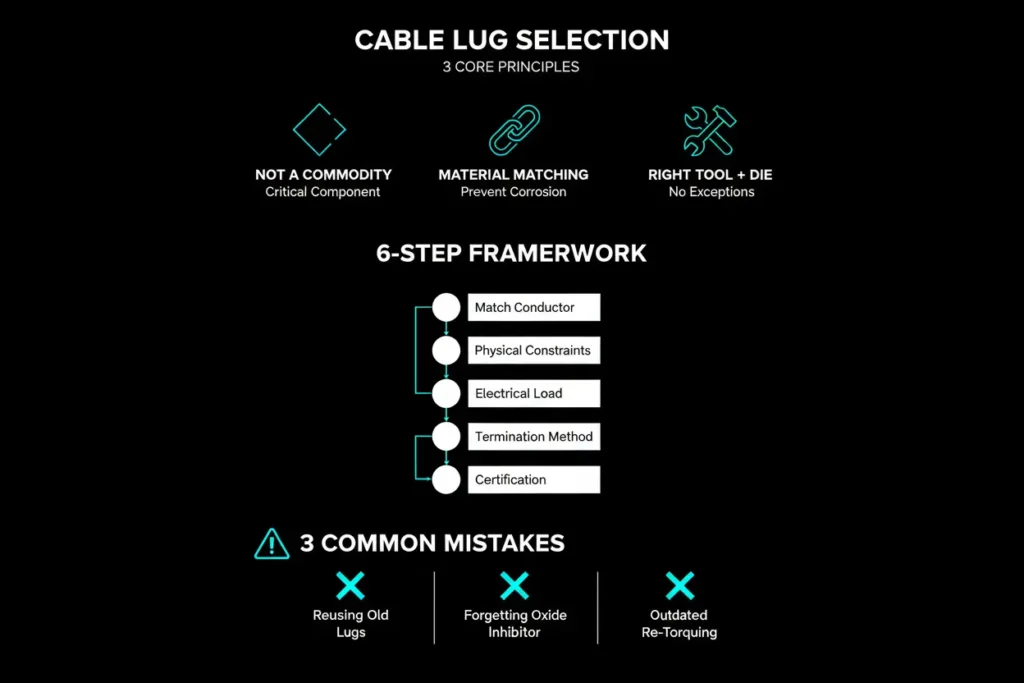
The 6-Step Selection Framework: An Engineer’s Guide
Forget guesswork. Follow this systematic process to ensure you select the right lug for your switchgear every single time.
Step 1: Match the Conductor (Cable First)
The lug must be a perfect match for the cable it’s terminating.
- Material: The primary rule is to match materials to prevent galvanic corrosion. Use copper lugs for copper cables and aluminum lugs for aluminum cables 。 For the common scenario of terminating an aluminum cable onto a copper busbar in a switchgear, you must use a bimetallic lug. These lugs have an aluminum barrel for the cable and a copper palm for the busbar, joined by a friction weld to ensure a safe transition .
- Size: The lug must be sized for the specific wire gauge (AWG or kcmil/mm²) of your cable. A lug that’s too large will result in a poor crimp with air gaps, creating high resistance and heat. A lug that’s too small will prevent proper cable insertion and damage the conductor strands .
- Stranding: Consider the cable’s stranding class. Highly flexible, fine-stranded cables may require specific lugs with a flared entry to prevent strand damage.
Step 2: Define the Physical Constraints
The lug must fit the termination point inside the switchgear perfectly.
- Termination Point: Inside switchgear, you’re almost always connecting to a busbar or a breaker stud. This calls for a ring terminal lug. Fork or spade terminals are not secure enough for the high currents and potential vibration in this environment.
- Number of Mounting Holes: For switchgear busbars, two-hole lugs are the professional standard. A single-bolt connection can loosen and rotate over time due to vibration and thermal cycling. A two-hole lug locks the termination in place, preventing this critical failure mode.
- Barrel Length: Lugs come in standard and long barrel types. For critical switchgear connections, a long barrel lug is superior. It allows for more crimps, creating a stronger mechanical pull-out strength and a more reliable, lower-resistance electrical connection.
Step 3: Verify Electrical & Thermal Load
The lug must be rated for the circuit’s demands.
- Ampacity: The lug, once correctly crimped to the cable, becomes part of the circuit. It must be rated to handle the maximum continuous current (ampacity) of the conductor without overheating. Always select a lug rated for equal or greater current capacity than your application requires .
- Voltage: Lugs also have a voltage rating (e.g., 600V, up to 35kV). Ensure the lug’s rating meets or exceeds the system voltage of the switchgear .
Step 4: Assess the Operating Environment
The switchgear’s environment dictates the lug’s material finish.
- Corrosion and Moisture: Switchgear can be located in environments with fluctuating humidity. To prevent oxidation and ensure a long-term, low-resistance connection, tinned copper lugs are the preferred choice. The tin plating provides excellent resistance to corrosion. Bare copper is only acceptable in perfectly dry, climate-controlled environments .
- Temperature: Ensure the lug is rated for the operating temperatures inside the switchgear enclosure.
Step 5: Select the Right Termination Method & Tooling
How you attach the lug is just as important as the lug itself.
- Compression Lugs: This is the most reliable method for power applications. It uses a specialized tool to permanently deform the barrel around the conductor. This is not just a tool; it’s a system. High-quality manufacturers specify the exact hydraulic or manual crimper and die set to be used with their lugs. Using the wrong tool/die combination will result in an improper crimp and is a direct violation of UL and IEC standards.
- Mechanical Lugs: These use set screws or shear bolts and don’t require a crimper. While convenient, it is absolutely critical to use a calibrated torque wrench to tighten the fasteners to the manufacturer’s exact specifications. Over-tightening can crack the lug, while under-tightening creates a loose, hazardous connection .
Step 6: Insist on Certified & Compliant Lugs
This is your quality assurance.
- For a purchasing manager or engineer, this is non-negotiable. The lug and its installation method must be certified by a recognized body. Look for markings on the lug or packaging that indicate compliance with UL 486A-486B (for the US market) and/or IEC 61238 (the international standard) . These standards ensure the lug has passed rigorous mechanical and electrical tests, including heat cycling and pull-out tests, proving its suitability for a safe and reliable connection.
Lessons from the Field: Common Mistakes to Avoid
I’ve been called to investigate failures that could have been easily prevented. Avoid these common but costly errors:
- Reusing Old Lugs: A lug is a one-time-use component. Once crimped, its structure is permanently altered. Removing and re-crimping a lug is a recipe for failure.
- Forgetting Oxide Inhibitor: When terminating an aluminum conductor, you must apply an oxide-inhibiting compound inside the lug barrel before crimping. This grease breaks down the thin, insulating layer of aluminum oxide that forms instantly on the wire and prevents it from re-forming inside the connection.
- The Myth of Periodic Re-Torquing: It used to be common practice to re-torque bolted connections every few years. This is outdated and dangerous advice. Modern research and manufacturer recommendations state that once a bolt is torqued correctly (especially with a Belleville washer), it should be left alone. Re-torquing can stretch the bolt beyond its elastic limit, permanently reducing its clamping force and creating a weaker connection. The modern best practice is thermal scanning (thermography) to identify hot spots, and only then should you de-energize and investigate the specific connection .
From Component to System Integrity
The next time you’re specifying a project or performing maintenance, remember the story of the silent factory. The integrity of your entire electrical system can depend on that small metal lug. By applying this rigorous, engineering-led approach, you move from simply “picking a part” to designing a reliable connection. It’s this attention to detail that separates a robust, safe electrical installation from a catastrophic failure waiting to happen. For your switchgear applications, always choose certified, high-quality components from a supplier who understands that reliability is everything.
