Cable Ties: From Taming Desk Chaos to Industrial Dominance
Look behind your desk, your television, or your computer. Chances are, you’ll see it: a tangled, chaotic nest of wires and cables. Now, imagine a world where that mess is transformed into a model of order and efficiency. That transformation is often accomplished by one of the most simple, yet ingenious, inventions of the modern era: the cable tie.
Also known as zip ties, these humble strips of plastic are the unsung heroes of organization. But their role extends far beyond tidying up home entertainment systems. In demanding industrial settings, cavernous data centers, and critical electrical installations, cable ties are indispensable components that ensure safety, reliability, and compliance. They prevent accidental damage, reduce fire risks, and make maintenance possible in highly complex environments.
This guide is your definitive resource for understanding the world of cable ties. We will journey from the basics of their design to the specifics of professional selection, covering everything you need to know to choose and use the right tie for any job, whether you’re a DIY enthusiast or a seasoned engineer.
Part 1: Understanding the Basics
At first glance, a cable tie seems incredibly simple. However, its design is a marvel of efficiency, and its variations are vast.
Anatomy of a Cable Tie
A standard cable tie consists of three main parts: a flexible, serrated strap; a pointed tail; and a small, open case at the other end, known as the head. Inside the head is an ingenious self-locking mechanism containing a tiny pawl, or ratchet. When the tail is threaded through the head, the pawl engages with the teeth on the strap. It allows the strap to be pulled tighter but prevents it from loosening or slipping backward, creating a secure, locked loop . This elegant, one-way system is what gives the cable tie its strength and reliability.
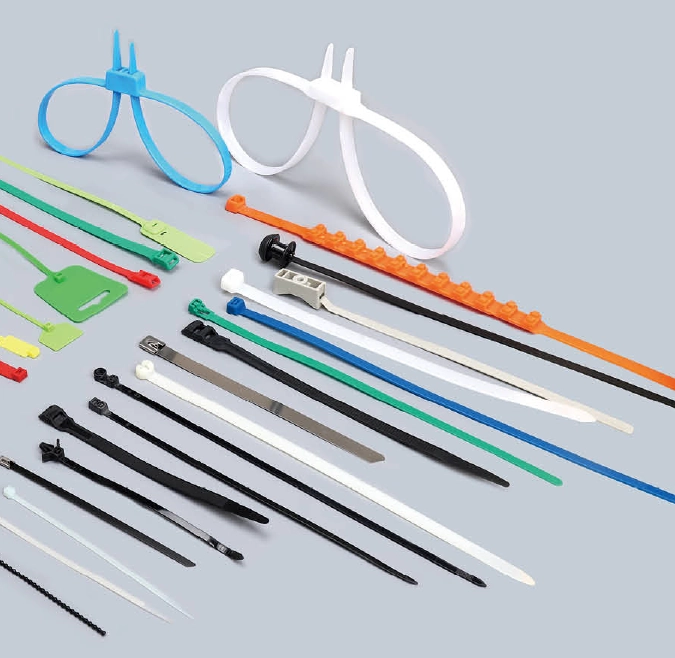
A World of Options: Types of Cable Ties
The apparent simplicity of the cable tie belies a wide variety of types, each designed for specific functions and environments. Choosing the correct one is critical for safety and long-term durability .
Types by Material
- Nylon 6.6 (Polyamide): This is the industry standard and the most common material for cable ties. It offers an excellent balance of strength, flexibility, and cost-effectiveness. It performs well in moderate temperatures (typically -40°C to 85°C) and is suitable for most general-purpose indoor applications .
- Stainless Steel: For the most demanding conditions, stainless steel ties are the ultimate solution. Made from high-grade steel (like 304 or 316), they offer superior tensile strength and exceptional resistance to corrosion, chemicals, fire, and extreme temperatures that can exceed 500°C. They are the go-to choice for marine, offshore, heavy industrial, and hazardous environments .
- Polypropylene: This material is used in environments with exposure to strong acids, bases, and other harsh chemicals where standard nylon would degrade. It offers superior chemical resistance but generally has lower tensile strength than nylon .
Types by Function
- Standard Ties: The single-use, self-locking ties used for most everyday bundling tasks.
- Heavy-Duty Ties: These are wider and thicker than standard ties, providing significantly higher tensile strength for securing large, heavy bundles in industrial or construction applications .
- Reusable/Releasable Ties: Designed with a small lever or tab on the head, these ties can be easily unlocked and reused multiple times. They are ideal for prototyping, temporary installations, or managing cable bundles that change frequently .
- UV-Resistant Ties: Typically black, these nylon ties contain carbon black or other stabilizers that protect the material from degradation caused by prolonged exposure to sunlight. They are mandatory for any outdoor application, from securing solar panel wiring to organizing cables on antenna masts .
- Heat-Stabilized Ties: Formulated to withstand continuous operating temperatures higher than standard nylon (often above 100°C), these ties are essential for use in automotive engine bays, near industrial machinery, or in hot attics .
- Marker/Identification Ties: These ties feature a small, flat flag or surface area near the head where you can write labels. They are invaluable for identifying and organizing complex networks of cables in data centers, server racks, and electrical panels .
- Screw-Mount Ties: Designed with an integrated mounting hole in the head, these ties allow a bundle to be securely fastened to a wall, panel, or chassis with a screw or bolt. This provides a robust, permanent anchor point, especially in high-vibration environments like vehicles or heavy machinery .
- Colored Ties: Available in a rainbow of colors, these ties are used for color-coding. This simple visual system helps technicians quickly identify different circuits, cable groups, or network segments, speeding up troubleshooting and maintenance .
Part 2: Making the Right Choice
With so many options available, selecting the perfect cable tie can seem daunting. The decision hinges on two key factors: the environment and the mechanical requirements of the job.
Material Showdown: Nylon vs. Stainless Steel
The choice between nylon and stainless steel is one of the most fundamental decisions in cable tie selection. Each has distinct advantages tailored to different applications.
| Feature | Nylon Cable Ties | Stainless Steel Cable Ties |
|---|---|---|
| Tensile Strength | Good to Excellent (18 lbs to 250 lbs) | Exceptional (Often exceeding 200-350 lbs) |
| Temperature Range | Typically -40°C to 85°C (-40°F to 185°F) | Extreme Range (e.g., -80°C to 538°C / -112°F to 1000°F) |
| UV Resistance | Requires special UV-stabilized (black) version for outdoor use. Standard nylon degrades. | Inherently immune to UV degradation. |
| Corrosion/Chemical | Vulnerable to strong acids and certain chemicals. | Highly resistant to corrosion, rust, and a wide range of chemicals. |
| Flexibility | Very flexible, ideal for tight spaces and irregular shapes. | Less flexible, requires more effort to install. |
| Cost | Highly affordable, cost-effective for general use. | Significantly more expensive per unit. |
| Ideal Uses | Indoor electrical wiring, office cable management, home DIY projects, light-duty bundling. | Marine/offshore, heavy industry, automotive, aerospace, hazardous or corrosive environments. |
(Table data synthesized from 4 and 2)
A Matter of Size: The Complete Cable Tie Sizing Guide
Choosing the right size is just as important as choosing the right material. A tie that is too small may fail under load, while one that is too large is wasteful and can be difficult to work with. The key parameters are length, width, and tensile strength.
- Length: This determines the maximum bundle diameter the tie can accommodate. You must choose a length that is sufficient to wrap around your bundle with enough extra tail to grip and tighten easily.
- Width: Along with thickness, the width is a primary factor in a cable tie’s strength. Wider ties distribute stress more evenly and offer higher tensile strength.
- Tensile Strength: Measured in pounds (lbs) or Newtons (N), this is the maximum amount of pulling force the tie can withstand before breaking. This is perhaps the most critical specification for ensuring a secure bundle, especially when supporting weight or dealing with vibration .
How to Choose the Right Length
To select the correct length, you first need to know the diameter of your cable bundle.
- Measure the Circumference: Use a flexible measuring tape or a piece of string to wrap around the bundle of cables or items you want to secure. Mark the point where the end meets the tape.
- Calculate the Diameter: Use the formula: Diameter = Circumference / 3.14 (π).
- Select the Tie: Choose a cable tie with a “Maximum Bundle Diameter” specification that is larger than your calculated diameter. It’s always best to have a little extra length to make installation easier .
Cable Tie Size Specification Chart (Nylon 66)
The following chart provides a quick reference for common nylon cable tie sizes and their corresponding tensile strengths. This allows you to match a tie’s capabilities to your project’s demands.
| Type | Length (inch) | Length (mm) | Width (mm) | Max. Bundle Dia. (mm) | Min. Tensile Strength (lbs) | Min. Tensile Strength (kgs) |
|---|---|---|---|---|---|---|
| Miniature | 4″ | 100 | 2.5 | 22 | 18 | 8 |
| WD-3×150 | 6″ | 150 | 2.5 | 35 | 18 | 8 |
| Intermediate | 8″ | 200 | 3.6 | 50 | 40 | 18 |
| WD-4×300 | 12″ | 300 | 3.6 | 80 | 40 | 18 |
| Standard | 8″ | 200 | 4.8 | 50 | 50 | 22 |
| WD-5×370 | 14.6″ | 370 | 4.8 | 102 | 50 | 22 |
| Heavy Duty | 15″ | 380 | 7.6 | 102 | 120 | 55 |
| WD-8×550 | 21.6″ | 550 | 7.6 | 165 | 120 | 55 |
| Extra Heavy Duty | 24″ | 610 | 9.0 | 180 | 175 | 79 |
| WD-10×1020 | 40″ | 1020 | 9.0 | 295 | 175 | 79 |
(Chart adapted from the detailed specifications provided in 5)
Part 3: Cable Ties in Action
The true measure of a cable tie is its performance in the field. From a clean home office to a vibrating factory floor, its applications are nearly limitless.
Applications Across Every Sector
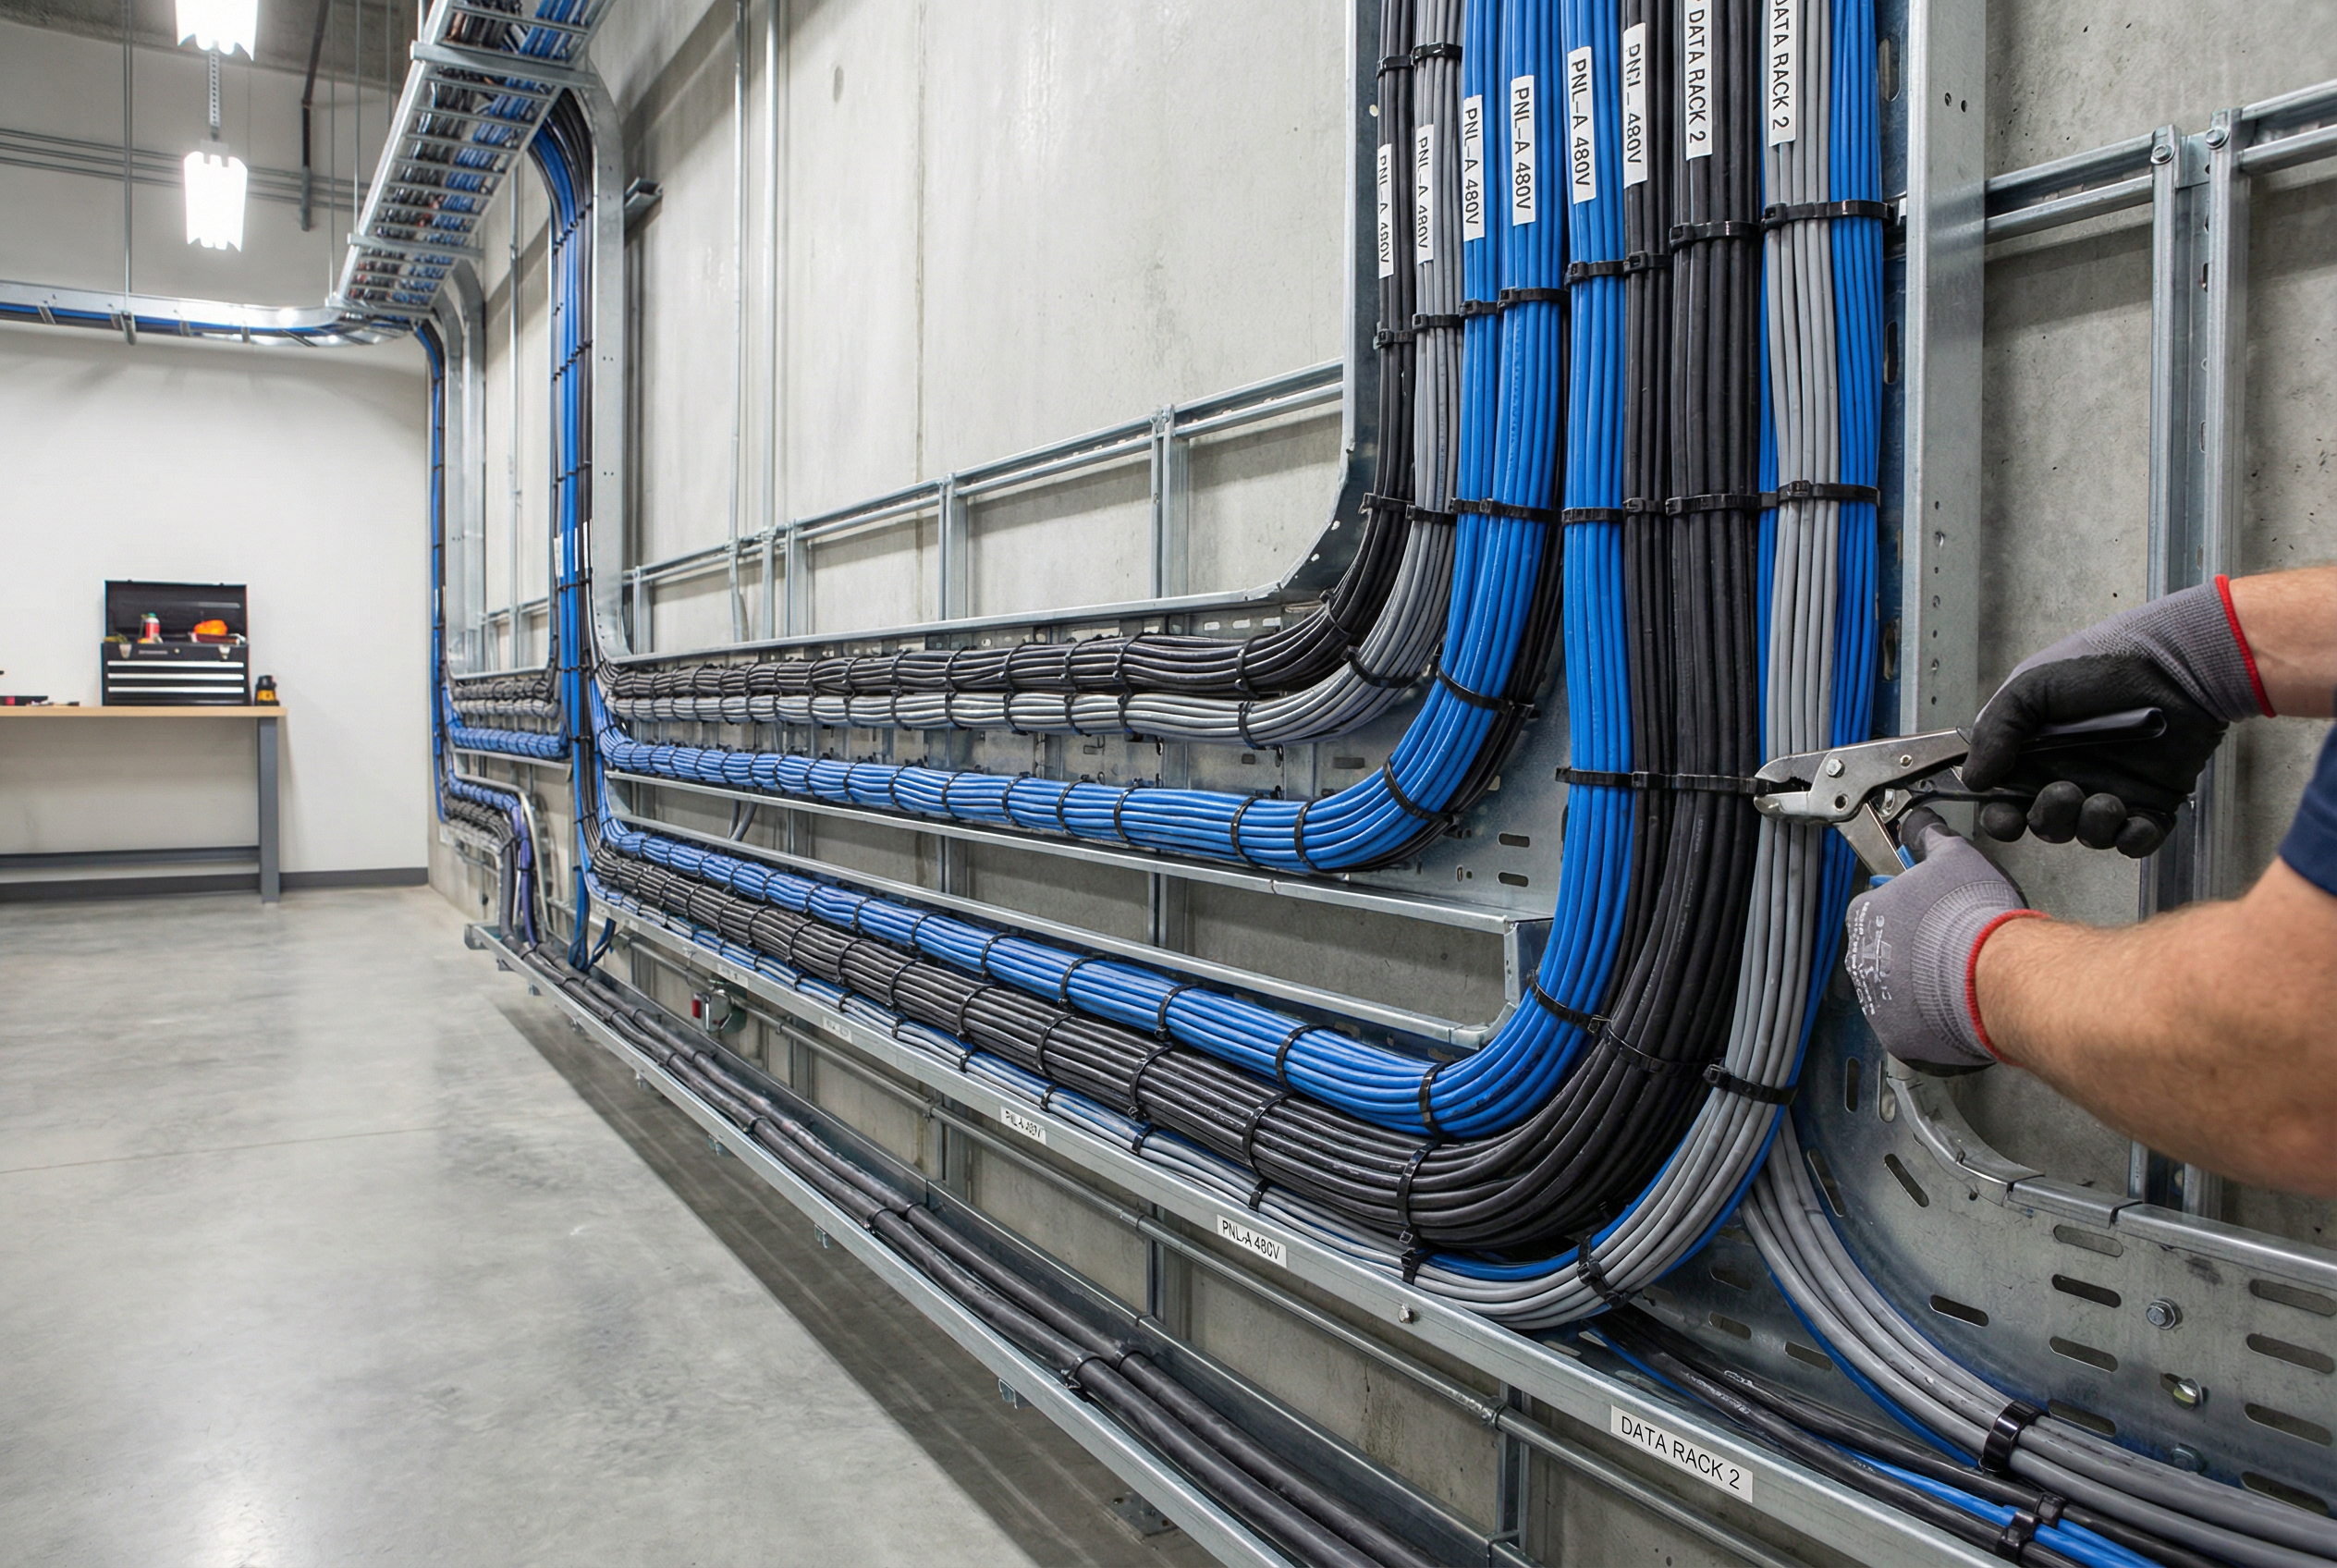
- Electrical & Industrial Installations: In electrical panels, cable ties bundle wires into neat looms, improving organization and making it easier to trace circuits. On factory floors, heavy-duty ties secure power conduits and pneumatic hoses to machinery, preventing them from snagging on moving parts and causing accidents or downtime .
- Data Centers & IT Infrastructure: Cable management is an art form in data centers. Here, ties (often reusable hook-and-loop types for patch cords and standard nylon for permanent backbones) are used to create structured bundles that optimize airflow for cooling and allow for methodical maintenance. A neatly tied server rack is a hallmark of a professional installation .
- Automotive & Marine: In vehicles, heat-resistant ties organize complex wiring harnesses in engine bays and secure them to the chassis to prevent rattling and chafing from vibrations. In marine settings, corrosion-resistant stainless steel ties are essential for securing cables and equipment exposed to saltwater and harsh weather .
- Home, Office, and DIY: Beyond professional use, cable ties are the ultimate life-hack tool. They organize computer cables, secure plants to garden stakes, create temporary zipper pulls, and even provide quick fixes for broken items around the house.
Installation Best Practices: A Professional’s Checklist
Using a cable tie is easy, but using it correctly requires attention to detail. Following best practices ensures a secure, safe, and professional-looking installation.
- DO Plan Your Route: Before bundling, group related cables together and plan their path to ensure a logical and tidy layout .
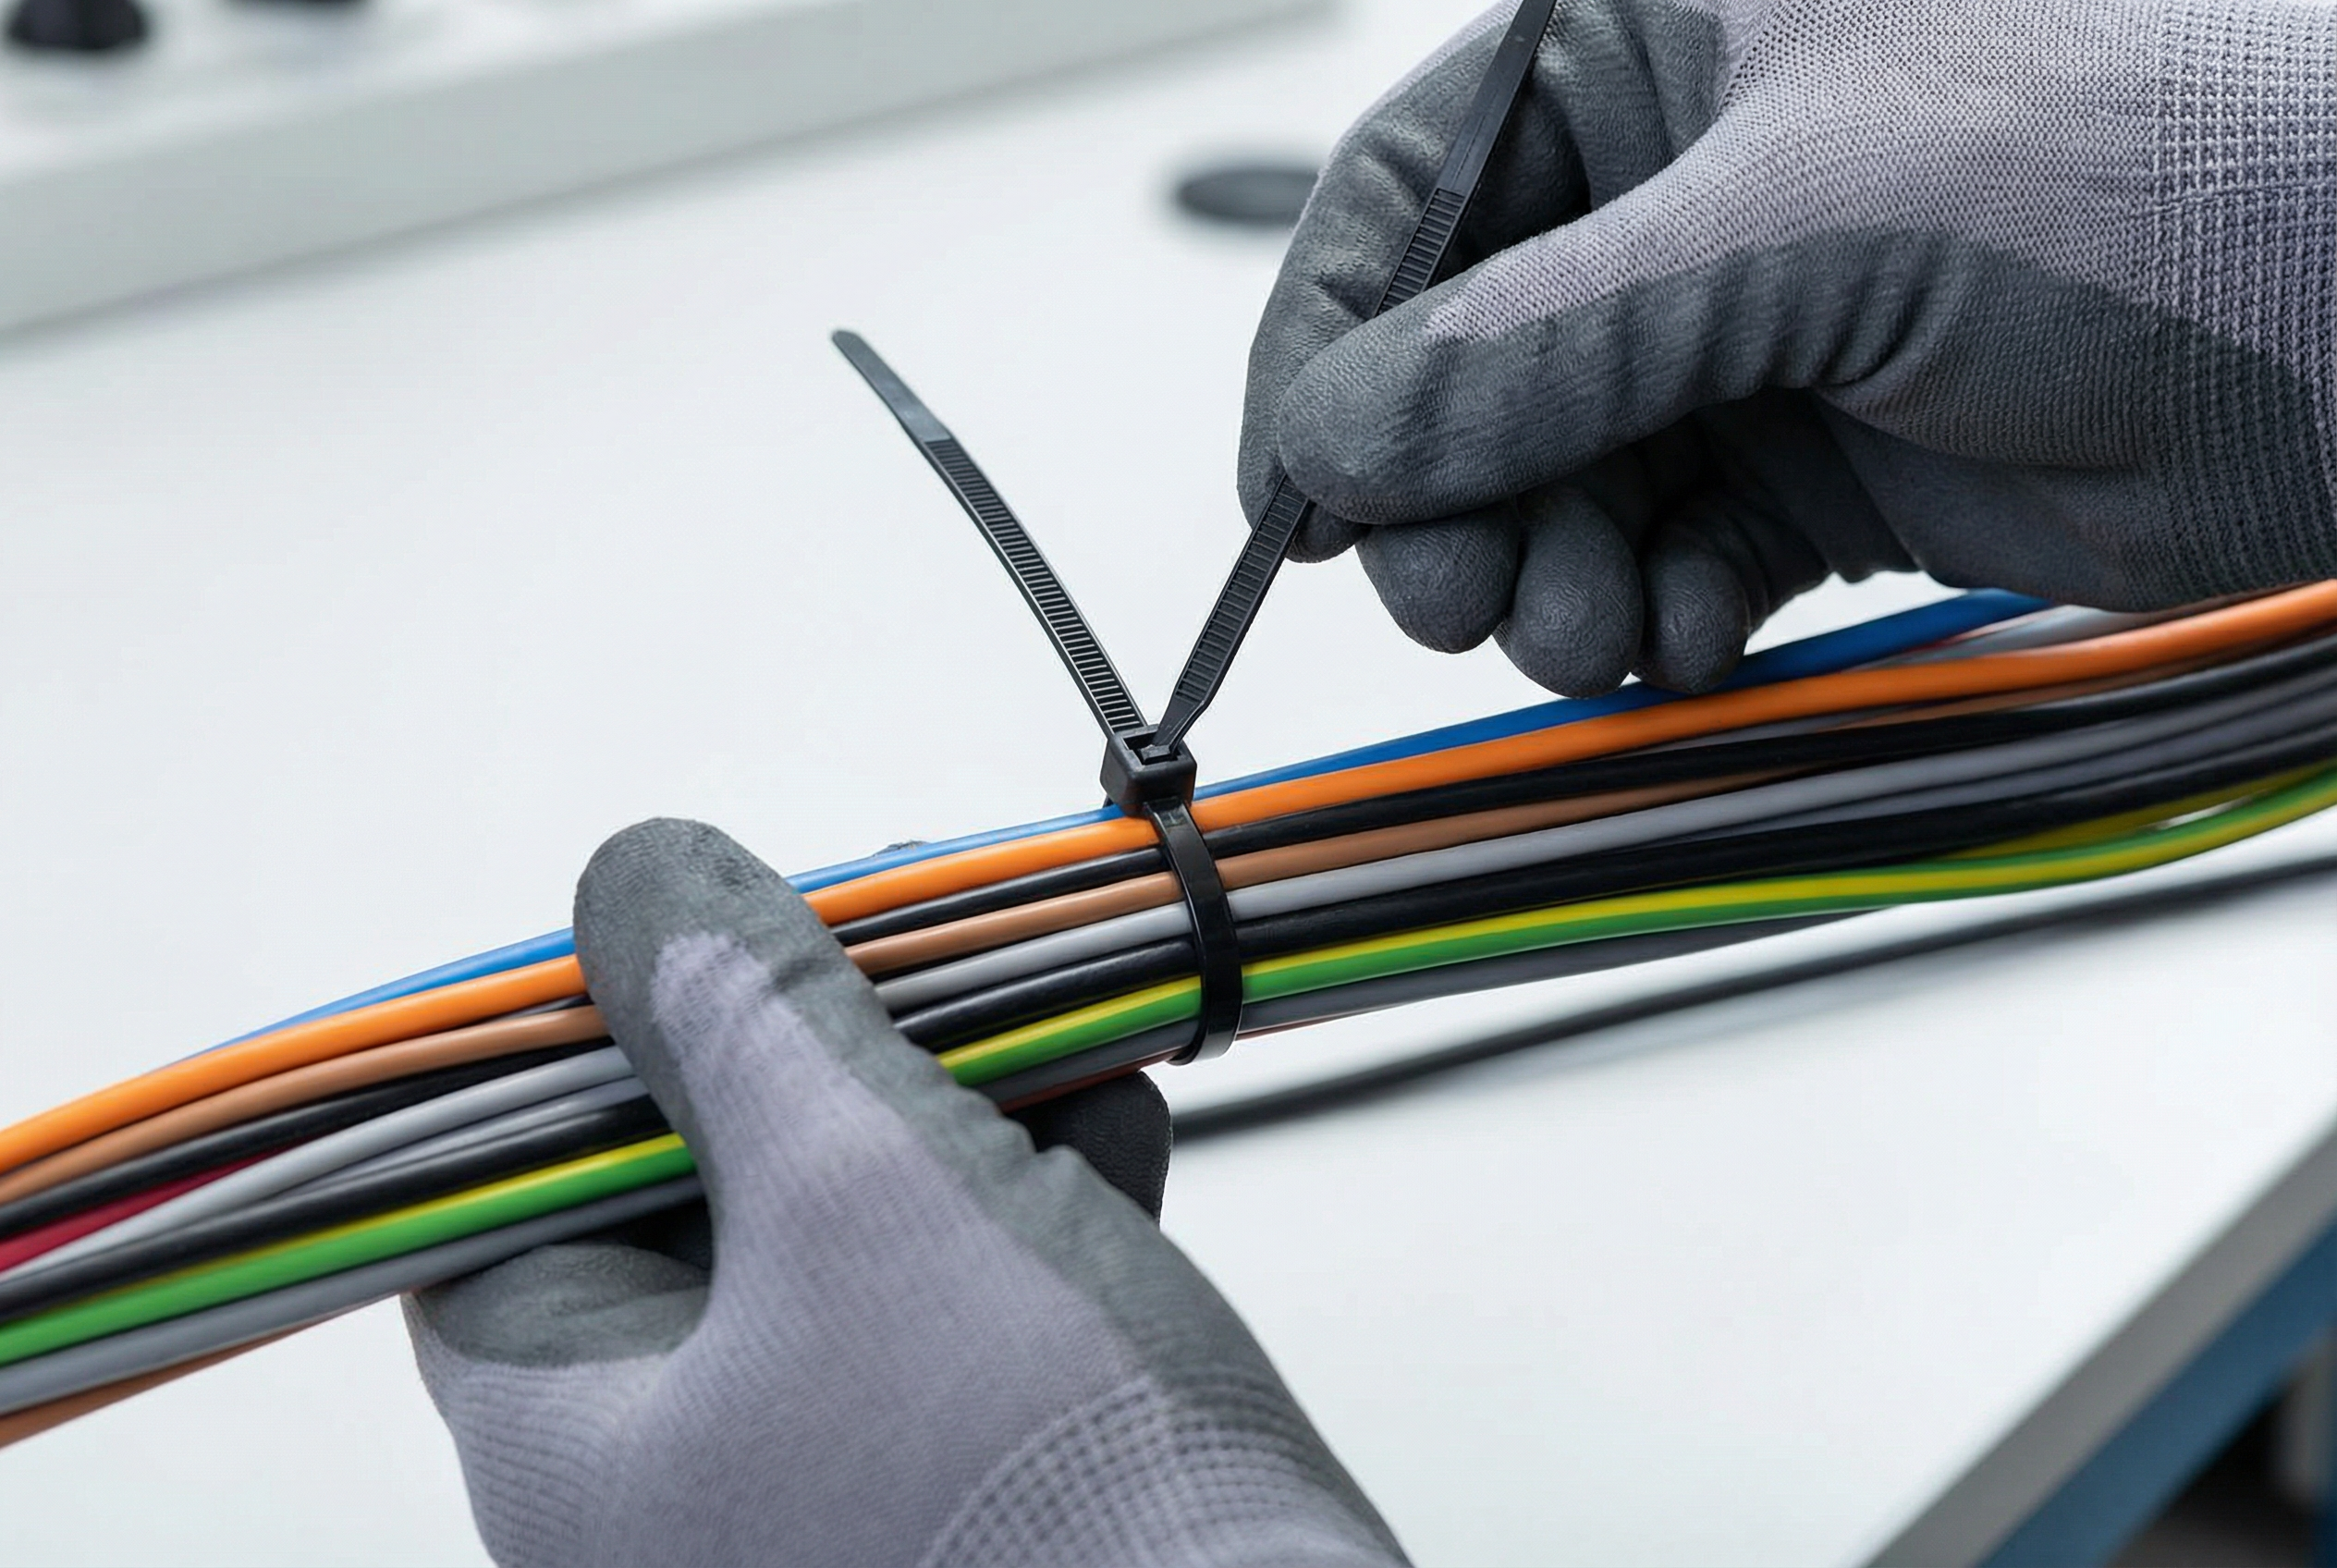
- DON’T Over-Tighten: This is the most common mistake. Pulling a tie too tight can crush sensitive data cables, damage insulation, and impede signal performance. The bundle should be snug but not constricted. Use a tensioning tool for precise, repeatable results 1.
- DO Trim the Excess Tail Flush: After tightening, use a flush-cutting tool to trim the excess tail as close to the head as possible. A poorly trimmed tie leaves a razor-sharp edge that can easily cut hands or adjacent cables .
- DO Use Appropriate Spacing: For long cable runs, use multiple ties at regular intervals to provide consistent support and prevent sagging.
- DON’T Use the Wrong Tie: Always match the tie to the environment. Use UV-resistant ties outdoors, heat-stabilized ties near engines, and stainless steel ties in corrosive areas.
- DO Use Color-Coding: In complex systems, use different colored ties to identify specific circuits or cable groups. This simple visual cue can save immense time during future maintenance and troubleshooting.
Part 4: Why Cable Ties Fail in Critical Installations—And How to Prevent It
You’ve just finished a perfect installation. Every cable neatly bundled, every tie precisely placed. Six months later, you’re called back because ties are snapping, cables are sagging, or worse—a fire inspector is pointing at melted plastic residue. What went wrong?
The answer usually lies in overlooking the standards and certifications that govern cable ties. For professionals, these aren’t just bureaucratic checkboxes—they’re your insurance policy against callbacks, safety incidents, and liability claims.
Understanding the Safety Ratings That Matter
Think of these standards as the “resume” of a cable tie. Just like you wouldn’t hire an electrician without checking their certifications, you shouldn’t specify a cable tie without understanding its ratings.
🔥 UL 94 Flammability Standard: Your Built-In Fire Extinguisher
This is the most critical safety rating you need to know. The UL 94 V-0 rating (the highest level) means the material will self-extinguish within 10 seconds if ignited, without dripping flaming particles that could ignite nearby materials.
Pro-Tip: In electrical panels, control cabinets, and public buildings, always specify UL 94 V-0 rated ties. Think of it this way: a V-0 tie won’t add fuel to the fire—it’s like having a small fire extinguisher built into every tie .
Real-World Scenario: I once investigated a data center incident where standard (non-rated) cable ties near a power distribution unit melted and dripped burning plastic onto critical fiber optic cables below, causing a cascade failure. A few cents more per tie for V-0 rating would have prevented hundreds of thousands in losses.
☠️ Halogen-Free: The Invisible Killer You Need to Avoid
Here’s something most engineers don’t realize: when some plastics burn, they release toxic halogen gases (chlorine, bromine) that are not just poisonous—they’re also highly corrosive to electronic equipment.
Key Takeaway: Halogen-free cable ties are non-negotiable for enclosed spaces like subways, data centers, server rooms, and office buildings. In a fire, smoke toxicity kills faster than flames. Halogen-free ties significantly reduce this risk 3.
Think of halogen-free certification as choosing between a smoky fire that poisons everyone and equipment versus one that just burns—still dangerous, but far less deadly.
♻️ RoHS Compliance: Beyond “Green” Marketing
RoHS (Restriction of Hazardous Substances) restricts lead, mercury, cadmium, and other toxins in electrical products. RoHS-compliant ties are safer for installers handling them daily and eliminate environmental contamination concerns during disposal.
Pro-Tip: If you’re working on projects in the EU, UK, or for multinational corporations, RoHS compliance isn’t optional—it’s mandatory. Non-compliant products can result in project rejections and legal liability.
Field Engineer’s FAQ: Real Problems, Real Solutions
Problem: “My outdoor installation failed after 6 months. What happened?”
Solution: You used standard indoor nylon ties. For any outdoor application with direct sun exposure, you must use UV-stabilized nylon cable ties (typically black with carbon black additive) or stainless steel ties.
Key Takeaway: Standard white/natural nylon ties become brittle under UV exposure—they’ll literally crumble in your hands. UV-stabilized ties contain protective additives, like sunscreen for plastic, that extend life to 5-10+ years outdoors .
Problem: “Can I just cut and reuse cable ties to save money?”
Answer: Absolutely not for standard ties. Here’s why: The pawl (locking tooth) in a standard tie is designed for one-way engagement. When you force it open, you’re mechanically damaging the locking mechanism. That tie now has compromised holding strength and will likely fail under load.
Pro-Tip: For applications where you need to make changes (prototyping, temporary setups, frequently reconfigured systems), specify releasable/reusable ties from the start. They cost 2-3x more but pay for themselves in labor savings .
Problem: “How do I calculate the tensile strength I actually need?”
Three-Factor Assessment Method:
- Static Load: Measure or calculate the actual weight of your cable bundle
- Dynamic Factors: Add 50-100% if the bundle will experience vibration, movement, or thermal expansion/contraction
- Safety Margin: Multiply your result by 2-3x for critical applications
Rule of Thumb:
- Light office/data cables → 18-50 lbs is sufficient
- Industrial control cables with moderate vibration → 50-80 lbs
- Heavy power cables or high-vibration environments → 120+ lbs minimum
Key Takeaway: Always overspec tensile strength. A tie that fails is far more expensive than the few cents you save by cutting corners.
Problem: “My cable tie is cutting into the wire insulation like a knife. What did I do wrong?”
Root Cause Analysis:This is a classic sign of either over-tightening or using a tie that’s too narrow for the load. The pressure is concentrated in too small an area, creating a “cheese wire” effect that slices through insulation.
Two-Part Solution:
- Choose a wider tie: Wider ties (e.g., 7.6mm vs. 4.8mm) distribute the same clamping force over a larger surface area, reducing pressure per square inch
- Use a tensioning tool: These tools have adjustable tension settings and automatic cutoff, preventing the #1 installation error—the “gorilla grip” over-tighten 2
Pro-Tip: If you see indentations in cable insulation after installation, you’ve gone too far. The bundle should be snug, not strangled.
Your Three-Step Cable Tie Selection Framework
After 15+ years in the field, I’ve distilled cable tie selection into a simple, repeatable framework. Follow these three steps, and you’ll specify the right tie every time:
Step 1: Define Your Environment
- Indoor/climate controlled → Standard Nylon 6.6
- Outdoor/UV exposure → UV-stabilized (black) nylon or stainless steel
- High temperature (>85°C) → Heat-stabilized nylon or stainless steel
- Corrosive/marine → Stainless steel (316 grade for saltwater)
- Fire-sensitive areas → UL 94 V-0 and halogen-free rated
Step 2: Calculate Your Load Requirements
- Measure bundle diameter (circumference ÷ 3.14)
- Estimate weight and add dynamic factors
- Apply safety margin (2-3x for critical applications)
- Select tie length and tensile strength from specification chart
Step 3: Consider Operational Needs
- Frequent changes required → Specify releasable ties
- Complex systems → Use color-coded or marker ties for identification
- Permanent installation → Use screw-mount ties for vibration resistance
- Professional appearance matters → Plan for flush-cutting excess tails
Key Takeaway: The right cable tie isn’t just about holding cables together—it’s about ensuring safety, enabling efficient maintenance, and protecting your professional reputation. Every tie you specify is a small investment in system reliability.
The humble cable tie has evolved from a simple bundling strap into a critical safety and organization component. From the tidy cables behind a home office desk to the mission-critical wiring harnesses in industrial control systems, its impact is profound and measurable. By understanding materials, mastering sizing, respecting standards, and following professional installation practices, you transform a commodity item into a reliability advantage.
Remember: Choosing the right cable tie is choosing between a system that works flawlessly for years and one that generates callbacks, safety incidents, and headaches. Make that choice count.
