
How to Install Heat Shrink Tube | Step-by-Step Guide


How to Install Heat Shrink Tube? In the world of electrical work, few things offer as much protection and organization as heat shrink tubing. When installed correctly, this simple thermoplastic sleeve provides a robust, form-fitting shield that protects vital connections from moisture, abrasion, dust, and other environmental hazards. Proper installation is not just about making your work look neat—it’s a critical step for ensuring long-term safety and reliability.
This comprehensive guide will walk you through everything you need to know, from selecting the right size to applying heat like a professional.
Gather Your Supplies: Tools and Materials for a Perfect Job
How to Install Heat Shrink Tube ?Before you begin, gathering the right tools will make the process smoother and safer. A well-prepared workspace is the first step toward a professional finish.
Here’s what you’ll need:
- Heat Shrink Tubing: Choose the correct type and size for your application.
- Industrial Heat Gun: This is the most important tool. A proper heat gun provides consistent, controllable temperature, which is essential for an even shrink. Avoid using lighters or torches, as they provide uncontrolled heat that can easily burn or damage the tubing and the components inside.
- Measuring Tool: A pair of calipers is ideal for getting precise diameter measurements. A ruler or measuring tape can also work.
- Cutting Tool: A sharp blade or a designated tubing cutter will ensure a clean, straight cut.
The Most Critical Step: How to Choose the Right Size
Choosing the wrong size is the most common mistake when using heat shrink tubing. If it’s too large, it won’t create a tight seal. If it’s too small, you won’t be able to slide it over your components.
How to Measure
Use your calipers to measure the diameter of both the widest and narrowest parts of the wire, cable, or connector you need to cover.
Understanding Shrink Ratios
The shrink ratio tells you how much the tubing will shrink.
- 2:1 Ratio: Shrinks to half its original diameter. Ideal for covering objects with a uniform shape.
- 3:1 or 4:1 Ratio: Shrinks to one-third or one-quarter of its original size. These are best for covering irregular shapes with varying diameters, like connectors and splices.
The Golden Rules for Sizing
- Rule #1: It Must Fit Over. The expanded (unshrunk) inside diameter of the tubing should be at least 25% larger than the widest diameter of your object. This gives you enough room to easily slide it into position.
- Rule #2: It Must Grip Tightly. The recovered (fully shrunken) inside diameter of the tubing must be smaller than the narrowest diameter of your object. This guarantees a snug, secure fit after heating.
Account for Length
Heat shrink tubing also shrinks in length, a factor known as longitudinal shrinkage. This is typically between 5% and 15%. To compensate, always cut your tubing slightly longer than the area you need to cover.
How to Install Heat Shrink Tube in 6 Simple Steps
With your materials ready and the right size selected, you’re ready for a perfect installation.
Step 1: Clean and Prepare the Surface
Any dirt, oil, or grease on the wire or component will compromise the seal. Wipe the surface clean with a suitable solvent. Also, ensure there are no sharp edges or burrs that could puncture the tubing as it shrinks.
Step 2: Cut the Tubing to Length
Using a sharp blade, cut the tubing to the desired length. Remember to add about 10-15% extra to account for longitudinal shrinkage, ensuring complete coverage after heating.
Step 3: Position the Tubing
Slide the cut piece of tubing over the wire and position it so that it completely covers the connection or area to be insulated. Important: Always slide the tubing onto the wire before making your final connection or splice.
Step 4: Apply Heat Systematically
Turn on your heat gun and allow it to reach the recommended temperature. Begin applying heat to the middle of the tubing, not the ends. Gradually work your way from the center toward one end, and then from the center toward the other. This technique pushes trapped air out and prevents bubbles from forming under the sleeve.
Step 5: Allow for Proper Cooling
Once the tubing has fully shrunk and conformed to the object, remove the heat. Let the tubing cool down naturally without touching it. This allows the material to harden and set properly, ensuring a durable and secure seal.
Step 6: Inspect the Final Seal
After the tubing is cool to the touch, give it a final inspection. It should be smooth and snug, with no wrinkles, bubbles, or loose spots. The seal should be uniform, providing a professional and protective finish.
Pro Techniques for Flawless Heat Application
Mastering your heat application is what separates an amateur from a professional job.
- Why a Heat Gun is Non-Negotiable: A heat gun provides consistent, controlled, and indirect heat. Open flames, like lighters or torches, are difficult to control and can easily lead to scorching, burning, or incomplete shrinking. A damaged tube loses its insulating properties and structural integrity.
- The “Start in the Middle” Method: Always heating from the center outwards is the single best way to prevent air from getting trapped. Trapped air can create pockets that allow moisture to enter and compromises the insulation.
- Keep It Moving: Constantly move the heat gun back and forth along the tubing and rotate the object if possible. Holding the heat in one spot for too long can cause overheating. An even application of heat is key to an even shrink.
- Adhesive-Lined Tubing: For applications requiring a waterproof seal, use dual-wall (adhesive-lined) tubing. When heating, continue until you see a small, clear bead of adhesive sealant emerge from the ends of the tube. This indicates the inner adhesive has melted and flowed, creating a complete environmental seal.
7 Common Installation Mistakes to Avoid
- Choosing the Wrong Size: The most frequent error. Always follow the sizing rules.
- Overheating: Applying too much heat can make the tubing brittle, discolored, or split.
- Uneven Heating: This causes wrinkles and weak spots. Keep the heat source moving.
- Using a Lighter: This leads to soot deposits and a high risk of burning the tubing.
- Skipping Surface Prep: Dirt and oil prevent a proper seal, especially with adhesive-lined tubing.
- Covering Sharp Edges: Sharp points can puncture the tubing as it shrinks. Smooth them down first.
- Forgetting to Slide the Tube On First: A frustrating mistake that forces you to undo your connection.
Troubleshooting Guide: Fixing Common Issues
- Problem: The tubing has wrinkles or “chill marks.”
- Cause: Uneven or insufficient heat.
- Solution: Gently reapply heat evenly around the wrinkled area until it smooths out.
- Problem: The tubing split or cracked.
- Cause: Overheating, using a tube that was too small, or stretching it over a sharp edge.
- Solution: This cannot be repaired. The piece must be carefully cut off and replaced.
- Problem: The fit is loose.
- Cause: The tubing selected was too large, or not enough heat was applied for it to fully recover.
- Solution: Try reapplying heat to see if it will shrink further. If not, the tubing is too big and must be replaced with the correct size.
Conclusion: Key Takeaways for a Lasting, Professional Finish
Properly installing heat shrink tubing is a skill that ensures your electrical work is safe, durable, and professionally finished. By focusing on three key principles—correct sizing, clean surfaces, and even heating—you can achieve a perfect result every time. Using high-quality materials combined with the right technique provides a reliable insulating barrier that will last for years.
For your next project, ensure you have the best materials for the job. Explore WILLELE.COM‘s full range of professional-grade, fire-resistant heat shrink solutions to guarantee a reliable and lasting result.
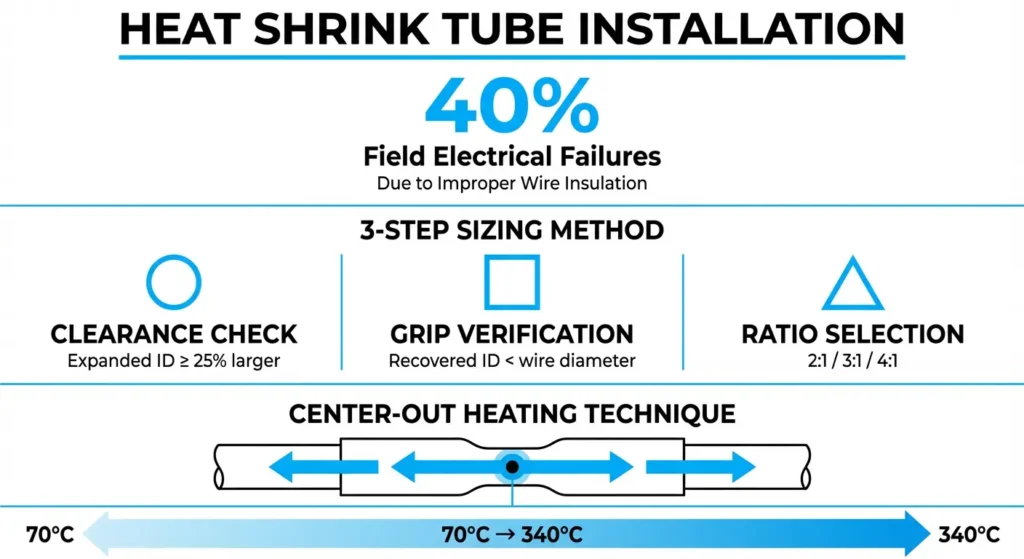
In my 15 years as a Senior Application Engineer, I’ve traced nearly 40% of field electrical failures back to a single, often overlooked detail: compromised wire insulation.
You can spend thousands on high-end PLCs, gold-plated connectors, and shielded cabling, but if your termination point is protected by nothing more than a wrapping of electrical tape, your system is a ticking time bomb. Tape peels, standard PVC sleeves slide, and moisture inevitably finds its way into the copper.
The solution isn’t just “covering the wire”—it’s engineering a seal. Heat shrink tubing is the ultimate solution to this problem. Unlike static insulation, heat shrink is dynamic; it remembers its original shape and, when activated by heat, contracts to form a high-pressure, form-fitting skin around your connection.
Think of standard insulation like wearing a loose raincoat—it keeps most of the rain off, but water can still get underneath. Heat shrink tubing, especially dual-wall varieties, is like a custom-fitted wetsuit. It seals against the skin (or wire), leaving absolutely no room for ingress.
This guide transforms the “simple” task of installing heat shrink into a precise engineering protocol. We will move beyond the basics and cover the physics of sizing, the chemistry of adhesion, and the art of thermal application.
Phase 1: The Engineering Science of Selection
Before you even pick up a wire strippers, you must understand the material science. Heat shrink works via cross-linked polymers. Radiation cross-linking creates a “memory” in the plastic. When you heat it, the crystalline structure melts and the material attempts to return to its original, smaller state.
The “3-Step Sizing Method”
The single most common mistake I see in the field is selecting tubing based on “eye-balling” it. This leads to loose fits or split tubes. Follow this 3-step framework for 100% accuracy:
Step 1: The “Clearance” Check (The 80% Rule)
The tubing must slide over your component without friction. The Expanded Inside Diameter (ID) of the tube should be at least 20-25% larger than the widest part of your object (the connector, lug, or splice).
🔑 Key Takeaway: If you have to force the tube on, you are pre-stretching the material. This causes thinning and weakens the final dielectric strength.
Step 2: The “Grip” Verification (The Recovery Limit)
The tubing must be able to shrink smaller than your object. The Recovered ID (the size it shrinks down to) must be smaller than the narrowest part of the wire or cable you are covering.
Step 3: The Ratio Selection
Different geometries require different shrink ratios. Use the table below to select the correct grade for your application.
| Shrink Ratio | Description | Typical Application | Ideal For |
|---|---|---|---|
| 2:1 | Shrinks to 50% of size | Standard wire jacketing, color coding | Uniform wires where the connector is roughly the same size as the cable. |
| 3:1 | Shrinks to 33% of size | Connector-to-cable transitions | Bridging the gap between a chunky ring terminal and a thin wire. |
| 4:1 / 6:1 | High shrink capability | Heavy industry, hydraulic fittings | Large connectors, repairing damaged cable jackets without removing connectors. |
💡 Pro-Tip: Always aim for the tubing to recover to about 80-90% of its maximum shrinkage. If a 10mm tube can shrink to 5mm, it grips best on a wire that is roughly 6-7mm. This ensures maximum hoop stress (gripping force) without splitting the tube.
Phase 2: Material Architecture – Single vs. Dual Wall
Engineers often ask me: “Do I really need the glue?”
My answer is usually: “Do you want a jacket or a seal?”
Understanding the difference between Single Wall and Dual Wall (Adhesive Lined) tubing is critical for environmental protection.
| Feature | Single Wall Tubing | Dual Wall (Adhesive Lined) Tubing |
|---|---|---|
| Structure | One layer of cross-linked polyolefin. | Outer polyolefin layer + Inner hot-melt adhesive layer. |
| Primary Function | Electrical insulation, abrasion resistance, strain relief. | Waterproofing, corrosion prevention, high-strength bonding. |
| Behavior | Shrinks and grips via friction. | Shrinks while adhesive melts, flowing into voids and bonding to the substrate. |
| Best Use Case | Indoor panels, color coding, bundling wires in dry cabinets. | Automotive engine bays, marine electronics, outdoor sensors, underground splices. |
Phase 3: The Professional Installation Protocol
Follow this 6-step protocol to replicate factory-quality terminations in the field.
Step 1: Surface Preparation (The Invisible Step)
Problem: Adhesives cannot bond to oil or dust.
Solution: Before sliding the tube on, clean the wire insulation and connector with a residue-free solvent (like Isopropyl Alcohol).
Check for Burrs: Run your finger over the connection. If you feel a sharp solder spike or wire strand, the heat shrink will split over it. Smooth it down with a file or emery cloth.
Step 2: Precision Cutting & Longitudinal Shrinkage
Heat shrink doesn’t just get narrower; it gets shorter. This is called Longitudinal Shrinkage and typically ranges from 5% to 15%.
- Calculation: If you need to cover exactly 50mm of wire, cut your tube to roughly 55-57mm.
- Technique: Use a sharp blade. A jagged cut creates a “stress riser,” which is a weak point where a tear will start forming once heat is applied.
Step 3: Positioning
Slide the tubing over the wire before crimping or soldering. (We have all made the mistake of soldering the connection and realizing the tube is still on the bench!). Center the tubing over the splice.
[IMAGE: Close up of tubing positioned over a wire splice, showing overlap on both sides]
Step 4: The “Center-Out” Heating Technique
This is where 90% of people fail.
Do not blast heat randomly. Do not start at one end and chase the air to the other.
- Start in the Center: Apply heat to the middle of the tube first.
- circumferential Heating: Rotate the gun (or the wire) to shrink the center ring fully.
- Work Outwards: Slowly move the heat gun toward one end, then return to the center and move to the opposite end.
Why this works: This technique forces air out of the ends of the tube. If you seal the ends first, you trap air bubbles inside. As the air expands with heat, it creates ugly blisters or prevents the adhesive from bonding.
[IMAGE: Diagram showing heat application pattern starting from center arrows pointing outward]
Step 5: Verify Adhesive Flow (For Dual Wall)
If using dual-wall tubing, apply heat until you see a tiny fillet of clear adhesive squeeze out from the ends of the tube. This “bead” confirms that the inner glue has fully melted and flowed, sealing the interface.
Step 6: The “Do Not Touch” Cooling Phase
The plastic is soft and vulnerable while hot. Do not bend the wire or check the stiffness until it is cool to the touch. Moving it prematurely can break the adhesive seal before it sets.
Phase 4: Process Control – Temperature & Tools
The tool you use dictates the quality of the result.
The “No Lighter” Policy
In a pinch, I’ve seen technicians use lighters. Don’t do it. Open flames deposit carbon soot (conductive!), cause uneven shrinkage, and degrade the polymer chains, making the tube brittle.
Heat Gun Parameter Guide
Use this quick reference to set your digital heat gun.
| Material Type | Minimum Shrink Temp | Full Recovery Temp | Max Safe Temp |
|---|---|---|---|
| Polyolefin (Standard) | 70°C (158°F) | 90°C (194°F) | 120°C (250°F) |
| Dual Wall (Adhesive) | 80°C (176°F) | 110°C (230°F) | 125°C (257°F) |
| Kynar / PVDF | 150°C (302°F) | 175°C (347°F) | 220°C (428°F) |
| Teflon / PTFE | 320°C (608°F) | 340°C (644°F) | 400°C (752°F) |
💡 Pro-Tip: Use a reflector nozzle attachment on your heat gun. This hook-shaped metal attachment directs hot air around the back of the wire, heating the tube from all sides simultaneously. It guarantees an even shrink without needing to constantly rotate the wire.
Phase 5: Advanced Troubleshooting (Root Cause Analysis)
Even experienced pros run into issues. Use this matrix to diagnose failures.
| Symptom | Probable Root Cause | Corrective Action |
|---|---|---|
| Tube Split / Cracked | 1. Overheating (Polymer degradation) 2. Tube size too small (Over-stress) 3. Sharp edge on component | 1. Reduce temp or increase distance. 2. Use a larger initial ID. 3. File down sharp edges before installing. |
| Wrinkles / Chill Marks | Uneven heating / Heat source too cool. | Re-apply heat uniformly. Use a reflector nozzle to distribute heat. 15 |
| Charring / Discoloration | Heat source too close or temp too high. | Back off! Keep gun 4-6 inches away and keep it moving. |
| Tubing slides after cooling | Recovery ID is too large for the wire. | The tube is fully shrunk but still too big. You must replace it with a smaller size or higher shrink ratio (e.g., switch from 2:1 to 3:1). |
| Bubbles under tube | Trapped air (Ends sealed first). | Switch to “Center-Out” heating technique. |
Quality Checklist: The “4-Point” Inspection
Before signing off on the job, perform this 4-point visual check:
- Smoothness: Surface is glossy (if applicable) and free of scorch marks or cracks.
- Conformity: The tube clearly follows the contours of the underlying component (you should be able to see the outline of the crimp barrel).
- Adhesive Bead: (For dual wall) A continuous ring of adhesive is visible at both ends.
- No Slippage: The tube cannot be rotated or slid along the wire by hand force.
Conclusion: The Difference is in the Details
Properly installing heat shrink tubing is a hallmark of a disciplined electrical engineer. It transforms a vulnerable connection into the strongest point in the circuit. By following the principles of correct sizing ratios, meticulous surface prep, and controlled thermal application, you ensure your systems can withstand the rigors of the real world.
For your next mission-critical project, don’t settle for generic supplies. Explore WILLELE.COM‘s full range of professional-grade, fire-resistant, and adhesive-lined heat shrink solutions to guarantee a result that lasts as long as the equipment itself.
