
Pin vs. Fork Comb Busbars: The Ultimate Selection & Installation Guide


Open any modern electrical distribution board, and you’ll see a model of efficiency and order. But it wasn’t always this way. Anyone who has worked on older panels knows the chaos of tangled wires—a “spaghetti junction” that is not only messy but also a significant safety hazard due to poor insulation and the risk of short circuits .
Fortunately, there’s a simple, elegant solution that has become a staple in modern electrical installations: the comb busbar. This article serves as your ultimate guide to understanding, selecting, and installing the two most common types: pin-type and fork-type busbars.
What is a Comb Busbar?
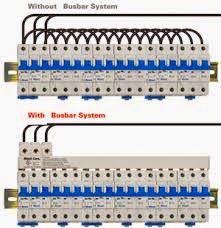
A comb busbar is a metallic conductor, typically made of copper, that serves as a common connection point to distribute power to multiple Miniature Circuit Breakers (MCBs) or other switchgear components . Instead of cutting and stripping numerous small wires to link breakers together, you use a single, rigid bar. This conductive bar functions as a central hub, receiving power from an incoming feeder and distributing it efficiently and safely to outgoing circuits .
The primary benefit is a drastic reduction in wiring complexity. This leads to a cleaner, more organized panel that is easier to troubleshoot, less prone to installation errors, and ultimately safer.
Meet the Contenders: Pin-Type vs. Fork-Type
Comb busbars primarily come in two distinct styles, defined by how they connect to the MCB terminals.
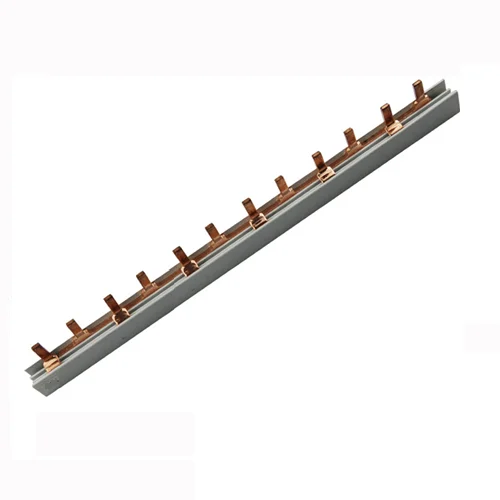
Pin-Type Comb Busbars: As the name suggests, these busbars feature a series of solid, round, or rectangular pins that extend downwards. They are designed to be plugged directly into the terminals of compatible circuit breakers. The connection is similar to plugging an appliance into a wall socket.
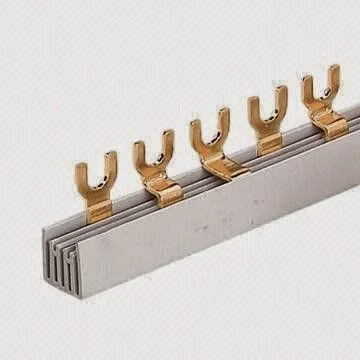
Fork-Type Comb Busbars: Also known as spade-type, these busbars have U-shaped fork or spade terminals. Instead of plugging in, these forks slide around the shank of the MCB’s terminal screw before it is tightened. The connection is secured by clamping the fork firmly under the terminal screw head or pressure plate.
Head-to-Head Comparison: Structural & Functional Differences
The choice between pin and fork isn’t just cosmetic; it dictates the type of breaker you can use and how the connection is made.
| Feature | Pin-Type Busbar | Fork-Type Busbar |
|---|---|---|
| Connection Method | Plugs directly into the terminal cage. | Slides around the terminal screw; clamped down. |
| Required MCB Terminal | Requires an MCB with a dedicated port for a pin. | Requires an MCB with a screw terminal and clamp. |
| Connection Security | Relies on spring tension within the terminal cage. | Relies on the torque applied to the terminal screw. |
| Installation Speed | Generally faster; simply plug and tighten. | Slightly slower; requires loosening and retightening the screw. |
Advantages and Disadvantages of Each Type
Your choice will ultimately depend on your specific equipment and application priorities, such as speed, security, or vibration resistance.
| Busbar Type | Advantages | Disadvantages |
|---|---|---|
| Pin-Type | – Faster installation. – Clean, plug-and-play connection. – Less prone to human error (over-tightening/under-tightening). – Better for applications requiring frequent reconfiguration. | – Requires specific MCB models with pin-compatible terminals. – Connection may loosen over time due to vibration. – Limited adjustability once installed. – Generally more expensive than fork-type. |
| Fork-Type | – Compatible with standard screw-terminal MCBs. – Provides a highly secure mechanical connection when properly torqued. – More resistant to loosening from vibration. – Generally more economical. – Easier to source as replacement parts. | – Slower installation process. – Requires proper torque application (too loose or too tight can cause problems). – Connection quality depends on installer skill. – Terminal screws may wear over repeated use. |
How to Choose: Key Selection Criteria
Selecting the right comb busbar type for your installation requires careful consideration of several factors:
1. MCB Compatibility
This is the most critical factor. Your choice is often predetermined by the circuit breakers you’re using:
- Check the manufacturer’s specifications for your MCBs to determine which terminal type they support.
- Some modern MCB ranges offer both pin and fork compatibility, giving you flexibility.
- If replacing an existing busbar, verify the terminal type before ordering.
- Consider future maintenance: using a common standard across your facility simplifies spare parts inventory.
2. Application Requirements
Different environments demand different solutions:
- High-vibration environments (industrial machinery, transportation): Fork-type busbars generally provide superior mechanical stability when properly torqued.
- Frequent reconfiguration needs (test panels, temporary installations): Pin-type busbars offer faster disconnection and reconnection.
- Large-scale installations (commercial buildings, data centers): Pin-type can reduce installation time significantly, lowering labor costs.
- Budget-conscious projects: Fork-type busbars are typically more economical and work with standard equipment.
3. Environmental Factors
Consider the operating conditions:
- Temperature cycling: Both types perform adequately, but ensure proper torque maintenance for fork-type connections in extreme temperature fluctuations.
- Corrosive atmospheres: Choose busbars with appropriate protective coatings (tin-plated or nickel-plated copper).
- Humidity: Ensure all connections are properly sealed and maintain adequate IP ratings for enclosures.
4. Current Rating and Circuit Configuration
- Verify the busbar’s current rating matches or exceeds your distribution requirements (common ratings: 63A, 100A, 125A).
- Consider the number of poles required (single-pole, three-pole, or four-pole configurations).
- Account for load diversity and future expansion needs.
5. Compliance and Standards
- Ensure the busbar meets relevant standards (IEC 60947, UL 67, or local electrical codes).
- Verify third-party certifications (CE marking, UL listing) for quality assurance.
- Check compatibility with your existing equipment’s certification requirements.
Installation Best Practices
Proper installation is crucial for safety, reliability, and longevity. Follow these guidelines for optimal results.
General Preparation (Both Types):
- Safety first: De-energize the panel completely and verify with a voltmeter. Lock out/tag out the main disconnect.
- Inspect components: Check the busbar for physical damage, proper current rating, and correct length.
- Clean terminals: Remove any oxidation, dirt, or debris from MCB terminals using a clean, dry cloth.
- Plan the layout: Arrange MCBs according to your circuit schedule before installing the busbar.
Pin-Type Installation:
- Mount the MCBs on the DIN rail in their final positions with adequate spacing (typically 18mm per pole).
- Align the busbar horizontally above the terminal cages, ensuring each pin aligns with its corresponding port.
- Insert the pins firmly into the terminal cages. You should feel a slight resistance followed by a secure click or lock.
- Verify engagement: Gently tug each connection point to confirm the pins are fully seated.
- Secure the busbar using any provided clips or retaining mechanisms to prevent lateral movement.
- Tighten retention screws on the MCB terminals according to the manufacturer’s specifications (typically 2-2.5 Nm).
Fork-Type Installation:
- Loosen terminal screws on all MCBs approximately 2-3 turns (don’t remove completely).
- Slide fork terminals around each screw shank, ensuring the fork’s opening faces the direction that tightening will pull closed.
- Position the busbar so all forks sit flat against the terminal surfaces without gaps.
- Tighten screws incrementally in sequence, working from one end to the other to maintain alignment.
- Apply proper torque: Use a calibrated torque screwdriver set to the manufacturer’s specification (typically 1.2-2.0 Nm for standard MCB terminals).
- Perform a visual inspection: Verify all forks are fully clamped with no visible gaps or tilting.
- Conduct a pull test: Gently pull on the busbar to verify all connections are secure.
Final Steps (Both Types):
- Double-check polarity: Ensure phase, neutral, and ground busbars are correctly identified and connected.
- Inspect for shorts: Visually verify no metal shavings or wire strands bridge between different potentials.
- Document the installation: Label circuits clearly and update panel schedules.
- Test before energizing: Use a continuity tester to verify proper connections.
- Energize gradually: When re-energizing, turn on circuits one at a time while monitoring for abnormalities.
Common Mistakes to Avoid
Even experienced electricians can fall into these traps. Here’s what to watch out for:
1. Mixing Incompatible Components
- Never force a pin-type busbar into a screw-terminal MCB or vice versa. This creates dangerous, unreliable connections.
- Don’t assume all MCBs from the same manufacturer use the same terminal type; always verify the specific model.
2. Improper Torque Application (Fork-Type)
- Under-tightening leads to high resistance connections, overheating, and potential arcing.
- Over-tightening can strip threads, crack terminals, or deform the fork, compromising the connection.
- Solution: Always use a calibrated torque screwdriver and follow manufacturer specifications.
3. Incomplete Pin Insertion (Pin-Type)
- Pins that aren’t fully seated create high-resistance connections and may fall out during operation.
- Always verify each pin has “clicked” into place and perform a gentle pull test.
4. Ignoring Phase Sequence
- Incorrect phasing can cause equipment malfunction or damage, especially for three-phase loads.
- Use a phase sequence indicator and clearly label phases (L1, L2, L3) throughout the installation.
5. Inadequate Current Rating
- Undersized busbars will overheat under normal load conditions, potentially causing insulation damage or fire.
- Always calculate total connected load and select a busbar rated at least 125% of the maximum expected current.
6. Poor Workmanship
- Damaged or oxidized conductors should never be used. Replace compromised components.
- Keep the work area clean; metal filings and wire strands can cause shorts.
- Don’t bend or twist busbars during installation, as this can stress the connections.
7. Skipping the Inspection
- Failing to verify connections before energizing can lead to catastrophic failures.
- Always perform visual inspection, continuity testing, and insulation resistance testing before commissioning.
8. Environmental Oversights
- Using standard copper busbars in corrosive environments without proper protection leads to premature failure.
- Ensure enclosure IP ratings are adequate for the installation environment.
Conclusion
The choice between pin-type and fork-type comb busbars isn’t about one being universally better than the other—it’s about selecting the right tool for your specific application. Pin-type busbars excel in speed and ease of installation, making them ideal for large projects or situations requiring frequent reconfiguration. Fork-type busbars offer superior mechanical security and compatibility with standard equipment, often at a lower cost.
Key Takeaways:
- Compatibility is paramount: Your MCB terminal type will often dictate your busbar choice.
- Consider the environment: Vibration, temperature, and corrosive conditions influence which type performs better.
- Installation quality matters: Even the best components fail if improperly installed. Use proper tools, follow torque specifications, and verify connections.
- Plan for the future: Consider maintenance requirements and the availability of replacement parts.
By understanding the structural differences, weighing the advantages and disadvantages, and following proper installation procedures, you can create electrical distributions that are safe, reliable, and easy to maintain. Whether you choose pins or forks, the key is to match the technology to the task at hand and execute the installation with care and precision.
The modern electrical panel—clean, organized, and efficient—is a testament to how simple innovations like the comb busbar can transform complex systems. Make your choice wisely, install it properly, and enjoy the peace of mind that comes with a professional-grade electrical distribution system.
